For the few of you who are my followers, Yes I am OK!! Life most certainly gets in the way of our best intentions, but I have not forgotten about this blog.
I will make no promises I cannot keep, so I cannot tell you when my next post will be but I will tell you there will be more. I am just not sure when.
Bear with me and don't give up on me. I will be back with great ideas and other fun stuff, I promise!!
Sunday, June 17, 2012

Sunday, April 8, 2012
Happy Easter! A bunny, wreath and a nest!!
Happy Easter to everyone!! I hope you are enjoying your day with friends and family!! We are off to eat our Easter ham dinner shortly!!
In the meantime, I thought I would share some fun Easter photos!! First is of some bunnies. The vintage looking one I purchased at my workplace about 5 years ago. He is my fav and they don't make him anymore. Too bad, I would have bought more!! The second bunny is a yard sale find from last year, as is the nest. These sit on my sideboard in the dining room!!

I also thought I would share with you the spring wreath that is on my front door. I made the wreath using the tutorial from Jones Design Company. I also made the nest using the tutorial from Miss Mustard Seed. I love the way it turned out!!


Enjoy!!
Kari
Linked to:
Newbie Party at Debbiedoos
In the meantime, I thought I would share some fun Easter photos!! First is of some bunnies. The vintage looking one I purchased at my workplace about 5 years ago. He is my fav and they don't make him anymore. Too bad, I would have bought more!! The second bunny is a yard sale find from last year, as is the nest. These sit on my sideboard in the dining room!!

I also thought I would share with you the spring wreath that is on my front door. I made the wreath using the tutorial from Jones Design Company. I also made the nest using the tutorial from Miss Mustard Seed. I love the way it turned out!!


Enjoy!!
Kari
Linked to:
Newbie Party at Debbiedoos
Saturday, March 24, 2012
Ace Hardware Paint Giveaway
First let me say that I am not being paid by Ace hardware for this post. The opinions are strictly mine!
Today, our local Ace Hardware, just a mile down the road, was giving away quarts of their new paint by Clark and Kensington. It is a paint and primer all in one. All you needed was a coupon, which was e-mailed to us because we are a member of the hardware rewards program. Yes, we are frequent visitors!!
So, we brought in the coupon and had it custom mixed, also for free, and home we went with our free quart. Do you want to see what color I chose.............
Its the pretty orange called Crouching Tiger. And yes, I love the kitchen! And what am I going to paint with it? That has yet to be determined, but it will probably be a piece of furniture. When I do use it I will most certainly share it with you!!
So, hurry and run on in to your local Ace hardware and get your free paint!!
Kari
Today, our local Ace Hardware, just a mile down the road, was giving away quarts of their new paint by Clark and Kensington. It is a paint and primer all in one. All you needed was a coupon, which was e-mailed to us because we are a member of the hardware rewards program. Yes, we are frequent visitors!!
So, we brought in the coupon and had it custom mixed, also for free, and home we went with our free quart. Do you want to see what color I chose.............
 |
| Picture credit-Ace Hardware |
Its the pretty orange called Crouching Tiger. And yes, I love the kitchen! And what am I going to paint with it? That has yet to be determined, but it will probably be a piece of furniture. When I do use it I will most certainly share it with you!!
So, hurry and run on in to your local Ace hardware and get your free paint!!
Kari
Sunday, March 4, 2012
Little White Cabinet with a Touch of Turquoise
Oh how I wish garage sale season would get here.....I am so ready. The thrift stores are so picked over and I need some "stuff". Up here in Michigan it will be a couple of more months!!!
Anyway, I picked up a cute little cabinet last summer at an estate sale. It looked like it had been handmade, and I found out later than it was, by the gentleman whose estate this was. Sad, he had passed away but there were a ton of treasures to be found!! The cabinet was pine and his dear wife had painted fruit on each of the drawers. Cute, but not the style I wanted!!
Sorry, I don't have a "before" pic. I am not very good at that!!
I removed the old hardware and painted it with Annie Sloan chalk paint in "Old White" -2 coats. I then distressed it- just sanding off some of the paint in spots.


I purchased some cute turquoise knobs at Hobby Lobby( half off) and added those to the drawers. They just add that cute touch!!


I put this little gem in my booth and she sold the very next day!! Maybe I will find more "gems" like this when garage sale season starts!! For now I am only dreaming!!
Kari
Linked to:
Newbie Party at Debbiedoos
Sunday Showcase Party
Anyway, I picked up a cute little cabinet last summer at an estate sale. It looked like it had been handmade, and I found out later than it was, by the gentleman whose estate this was. Sad, he had passed away but there were a ton of treasures to be found!! The cabinet was pine and his dear wife had painted fruit on each of the drawers. Cute, but not the style I wanted!!
Sorry, I don't have a "before" pic. I am not very good at that!!
I removed the old hardware and painted it with Annie Sloan chalk paint in "Old White" -2 coats. I then distressed it- just sanding off some of the paint in spots.

The finished product!!

I purchased some cute turquoise knobs at Hobby Lobby( half off) and added those to the drawers. They just add that cute touch!!


I put this little gem in my booth and she sold the very next day!! Maybe I will find more "gems" like this when garage sale season starts!! For now I am only dreaming!!
Kari
Linked to:
Newbie Party at Debbiedoos
Sunday Showcase Party
Saturday, February 4, 2012
Easy and Cheap Valentines Project- Take 2
I promised another Valentines project before Sunday so here goes!!
I wanted again to create something with things I already had. So here is what I came up with.

This is what I used:
1 felt rose placemat
cream wool felt( I used an old sweater)
twine
burlap rosette
hot glue
heart pattern ( mine was cut using my cricut)
Make a heart pattern, any size you would like. Cut out your heart from both the felt placemat and the felted wool. Glue the placemat heart onto the wool felt heart using hot glue. Glue a burlap rosette at the top point of the heart ( see pic). There are plenty of tutorials out there for making rosettes just use your fav one!! Glue a piece of twine on for hanging and you are done.

Easy, easy and cost nothing. How cute would these be hanging form doorknobs, a hook, or some bare tree branches stuck into an urn!!
Kari
Linked to:
Sunday Showcase Party
I wanted again to create something with things I already had. So here is what I came up with.

This is what I used:
1 felt rose placemat
cream wool felt( I used an old sweater)
twine
burlap rosette
hot glue
heart pattern ( mine was cut using my cricut)
Make a heart pattern, any size you would like. Cut out your heart from both the felt placemat and the felted wool. Glue the placemat heart onto the wool felt heart using hot glue. Glue a burlap rosette at the top point of the heart ( see pic). There are plenty of tutorials out there for making rosettes just use your fav one!! Glue a piece of twine on for hanging and you are done.

Easy, easy and cost nothing. How cute would these be hanging form doorknobs, a hook, or some bare tree branches stuck into an urn!!
Kari
Linked to:
Sunday Showcase Party
Wednesday, February 1, 2012
Easy, Inexpensive (cheap) Valentine Project
My goal this week is to do 2 blog posts by Sunday, and they will both be about Valentines projects!! Yippee, lets see if I can do that........Yes I think I can!!!
OK.....lets start out with the first one.
I wanted to make something cute that I could sell in my booth and I did not want to spend any money. So I combed my craft stash and came up with these:
A $1 frame from Michael's
A wooden heart left over from another project
2 pieces of scrapbook paper ( one black print, the other red)
Some mod podge
Off white paint for the frame
some e6000 adhesive
So first I painted the frame off white ( sorry I did not take pics but all of this is easy) 2 coats.
Then I covered the wooden heart with the red scrapbook paper, using mod podge.
Then, I covered the cardboard backing that came with the frame using the black and white scrapbook paper and mod podge.
I added a little bit of brown distress ink to distress the heart after it dried, but this step is optional.
I then put the frame back together and using the e6000 I glued the heart right on the glass.
Voila, done.......and here is the finished project. Cost to me, $0, because I had all the supplies!! YES!!


So....what do you think?
Look for another Valentines project coming up before Sunday night!!
Kari
Linked to:
Tater Tots and Jello Weekend Wrap up Party
Wow us Wednesdays at Savvy Southern Style
OK.....lets start out with the first one.
I wanted to make something cute that I could sell in my booth and I did not want to spend any money. So I combed my craft stash and came up with these:
A $1 frame from Michael's
A wooden heart left over from another project
2 pieces of scrapbook paper ( one black print, the other red)
Some mod podge
Off white paint for the frame
some e6000 adhesive
So first I painted the frame off white ( sorry I did not take pics but all of this is easy) 2 coats.
Then I covered the wooden heart with the red scrapbook paper, using mod podge.
Then, I covered the cardboard backing that came with the frame using the black and white scrapbook paper and mod podge.
I added a little bit of brown distress ink to distress the heart after it dried, but this step is optional.
I then put the frame back together and using the e6000 I glued the heart right on the glass.
Voila, done.......and here is the finished project. Cost to me, $0, because I had all the supplies!! YES!!


Look for another Valentines project coming up before Sunday night!!
Kari
Linked to:
Tater Tots and Jello Weekend Wrap up Party
Wow us Wednesdays at Savvy Southern Style
Friday, January 13, 2012
Orange and Cottage Style....um?
My style is most definitely "cottage style" and maybe a touch on the traditional side. I am not sure that orange would work with "me". But before I jumped to conclusions I decided to search and see what I could find that was orange and "cottagey".
There was much more out there than I thought and I liked a lot of it. Maybe not enough to redo a room in my house, but I liked it nonetheless.
 Here is what I found:
I really liked this living room with its touches of orange combined with fuchsia. Just enough I think!!

This room is so very coastal. I loved all the texture and just small pops of color.

The orange and periwinkle pillows were what drew me in here.

This one is by far my favorite. It looks so calm and serene. Now, this room is one I may recreate!!
I should add that all photos are from pinterest. It was fun to see how I could make this color work with my style!!
What do you think?
Kari
Sunday, January 1, 2012
Happy New Year and My Fav Posts of 2011!!
Happy New Year to all of you!! I wish you a wonderful and prosperous new year!!
Looking back on all of my posts(which I know were irregular and erratic and followed not order and gave not a clue when and if I would ever post again,) I decided to pick my favorites. But before I do that, I want to say that one of my resolutions is to post more often, share more projects, and to be a better blogger. I am going to try very, very hard to do that!! I promise!!
That said here are my favorite two posts of 2011!
 First, I loved how the pics of my guest room turned out and I just love that room. Its my favorite in the whole house. If you missed that post you can see it here.
My favorite project of 2011 was my farmhouse chair.
 If you missed that post you can see it here.
I look forward to sharing new projects, and new decorating ideas with you in 2012!!
Kari
Looking back on all of my posts(which I know were irregular and erratic and followed not order and gave not a clue when and if I would ever post again,) I decided to pick my favorites. But before I do that, I want to say that one of my resolutions is to post more often, share more projects, and to be a better blogger. I am going to try very, very hard to do that!! I promise!!
That said here are my favorite two posts of 2011!
My favorite project of 2011 was my farmhouse chair.

I look forward to sharing new projects, and new decorating ideas with you in 2012!!
Kari
Thursday, December 22, 2011
Merry Christmas To All..........
and to all a good night!! The retail insanity has just a couple of days left. Then sleep will come. For those of you who have ever worked retail you know how it goes.
I would just like to take this time to wish you all a very Merry Christmas and thanks so much for all the kind words and praise. It means so much.
I leave you with a photo of my Christmas tree in all its nighttime glory!!!!
Kari

I would just like to take this time to wish you all a very Merry Christmas and thanks so much for all the kind words and praise. It means so much.
I leave you with a photo of my Christmas tree in all its nighttime glory!!!!
Kari

Tuesday, December 6, 2011
Itty Bitty Sheet Music Trees
A couple of weeks ago before the open house at "Not so Shabby", I made some large sheet music trees following the tutorial on HGTV.com. I loved how they turned out!! And they were quite a bit of work but easy.......just labor intensive!!
When I was working in my booth last week, a customer requested that I make some small (like 5-6" tall) sheet music trees to use in homemade snow globes. So I thought, why not, I can do this! I made my own cones out of a cereal box. I then followed the same method for making the larger trees. When I was done I glued either a star or a small bead on the top. I also used some glitter glue to embellish a few of the "branches". And yes, they are for sale in my booth but I had to photograph them next to the church in my Christmas village.


So, so cute!!
Enjoy!!
Kari
Linked to:
http://savvysouthernstyle.blogspot.com/
http://funkyjunkinteriors.blogspot.com
http://debbie-debbiedoos.blogspot.com/
When I was working in my booth last week, a customer requested that I make some small (like 5-6" tall) sheet music trees to use in homemade snow globes. So I thought, why not, I can do this! I made my own cones out of a cereal box. I then followed the same method for making the larger trees. When I was done I glued either a star or a small bead on the top. I also used some glitter glue to embellish a few of the "branches". And yes, they are for sale in my booth but I had to photograph them next to the church in my Christmas village.


So, so cute!!
Enjoy!!
Kari
Linked to:
http://savvysouthernstyle.blogspot.com/
http://funkyjunkinteriors.blogspot.com
http://debbie-debbiedoos.blogspot.com/
Tuesday, November 29, 2011
Yardstick Stars
A while ago I was at a local thrift store run by the local Humane Society. I don't usually find much there but I like to go in and see the cats they have for adoption, plus it is next to Hobby Lobby so I ventured in.
In a corner I found a tub full of yardsticks. They are probably not vintage but they were cheap so I bought a bunch at .29 each. I was not sure what I was going to do with them. So I googled projects with yardsticks and came across a tutorial for a yardstick star at Mamie Janes. So I made a few. A couple I put in my booth and one I strung with red Christmas lights and hung it on my fence.
Here is one pictured in my booth.........

I just love the rustic look. I may try cutting one up and making ornaments like Mamie Jane did too. See her ornaments here.
Enjoy!
Kari
In a corner I found a tub full of yardsticks. They are probably not vintage but they were cheap so I bought a bunch at .29 each. I was not sure what I was going to do with them. So I googled projects with yardsticks and came across a tutorial for a yardstick star at Mamie Janes. So I made a few. A couple I put in my booth and one I strung with red Christmas lights and hung it on my fence.
Here is one pictured in my booth.........

I just love the rustic look. I may try cutting one up and making ornaments like Mamie Jane did too. See her ornaments here.
Enjoy!
Kari
Thursday, November 17, 2011
Not So Shabby Open House
Last weekend the shop where I sell my creations had their annual open house. It was a rousing success!!
I worked like crazy to get everything ready. My booth was all set to go with the theme "Rustic Elegance". I also took on a table to decorate with some garage sale finds. It all turned out so cute. I thought I would share some pics.


All the rest of these pictures are of some of my fellow vendors creations and booth pictures. All the pics are from "Not so Shabby's" facebook page.
Enjoy!!
Kari
 |
| My booth |
 |
My booth and others |


All the rest of these pictures are of some of my fellow vendors creations and booth pictures. All the pics are from "Not so Shabby's" facebook page.
Enjoy!!
Kari
Friday, November 4, 2011
MIA and Unique Gift Wrap
I know, I know I did no posting in the month of Oct. Bad, bad, blogger. I could come up with a million excuses but basically life just got ahead of me. So I am back, full of fun ideas for the upcoming Christmas season and lots of just plain fun stuff!!
Tomorrow, the hubby and I are headed to a wedding. I wanted to do a unique gift wrap. Something memorable, something different.
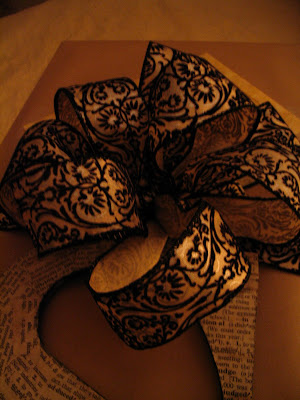
So.........I took some brown craft paper and wrapped the 2 boxes. I then taped the boxes together using packing tape. I went to Hobby Lobby and using a 40% off coupon, I purchased a fun ribbon. I then tied the ribbon around the 2 boxes and made a bow. Also, at Hobby Lobby, a purchased a wood "S" , the new couples monogram. I painted the back of the "S" black and covered the front with old dictionary pages using mod podge. I then used walnut distress ink to give it more of a distressed look. I then put a sawtooth hanger on the back and using twine tied it to the ribbon. Voila, a unique gift wrap that will be as memorable as the present!!!



What is in the present you may ask? I will reveal that later after the wedding. We don't want to spoil the surprise!!!
Kari
Linked to:
tatertotsandjello.com
Tomorrow, the hubby and I are headed to a wedding. I wanted to do a unique gift wrap. Something memorable, something different.
So.........I took some brown craft paper and wrapped the 2 boxes. I then taped the boxes together using packing tape. I went to Hobby Lobby and using a 40% off coupon, I purchased a fun ribbon. I then tied the ribbon around the 2 boxes and made a bow. Also, at Hobby Lobby, a purchased a wood "S" , the new couples monogram. I painted the back of the "S" black and covered the front with old dictionary pages using mod podge. I then used walnut distress ink to give it more of a distressed look. I then put a sawtooth hanger on the back and using twine tied it to the ribbon. Voila, a unique gift wrap that will be as memorable as the present!!!


Kari
Linked to:
tatertotsandjello.com
Thursday, September 29, 2011
Tip Of the Week Thursday- Homemade Laundry Stain Remover
This recipe for homemade laundry stain remover I got from a neighbor years ago. It sure beats the commercial stain removers and removes just about every stain. I have used it on all types of fabric but if you are in doubt about the colorfastness then test it on an inside seam.
1/2 cup liquid laundry detergent ( I like Tide but any will work)
1/2 cup hydrogen peroxide
1/4 cup water
Mix all the ingredients together in a spray bottle. Shake well. Spray on stains and wash as usual!!
Happy Laundry Day!!!
Kari
If you have a tip for me I will try to use it on my Thursday posts. Just leave a comment!! Thanks!!
1/2 cup liquid laundry detergent ( I like Tide but any will work)
1/2 cup hydrogen peroxide
1/4 cup water
Mix all the ingredients together in a spray bottle. Shake well. Spray on stains and wash as usual!!
Happy Laundry Day!!!
Kari
If you have a tip for me I will try to use it on my Thursday posts. Just leave a comment!! Thanks!!
Tuesday, September 27, 2011
Puppy Dog Birthday Cake
Yesterday was my birthday........Happy Birthday to me!! My dear husband got me the cutest cake from our local bakery. I love dogs as many of you know. Well, he got me a dog cake. I think that the pictures say it all............so here is the cake with a close up of a couple of the dogs!!


I so love it!! Maybe those of you that decorate cakes( not me sorry!) can find some inspiration from this.......It would be cute for a kids b-day!!
Kari
PS. The cake was marble, with raspberry filling and buttercream icing!!
Linked to:
http://savvysouthernstyle.blogspot.com/


I so love it!! Maybe those of you that decorate cakes( not me sorry!) can find some inspiration from this.......It would be cute for a kids b-day!!
Kari
PS. The cake was marble, with raspberry filling and buttercream icing!!
Linked to:
http://savvysouthernstyle.blogspot.com/
Thursday, September 22, 2011
Tip of the Week Thursday-Tinting Chalk Paint
This weeks Thursday tip involves my favorite paint- chalk paint. I do a lot of small painting projects and I really cannot afford to buy chalk paint in every color. I wish I could but it is beyond my budget and as we talked last week- I am cheap!!
So I took this......

And mixed it with some of this.......

What I did was took chalk paint in old white and mixed it with some craft paint to get the desired color. I just mixed enough for my project ( maybe a little bit more so I did not run out) I used just a few drops of the craft paint. The paint still had the desired "chalkiness" and distressed wonderfully!!
Here is a large spoon I painted grey using old white chalk paint and slate gray craft paint.........


 I have done this with several other small projects and it works great!!
Got a tip to add to "Tip of the Week"..........just leave a comment and I will try and use it!! Thanks!!
Kari
So I took this......
And mixed it with some of this.......
What I did was took chalk paint in old white and mixed it with some craft paint to get the desired color. I just mixed enough for my project ( maybe a little bit more so I did not run out) I used just a few drops of the craft paint. The paint still had the desired "chalkiness" and distressed wonderfully!!
Here is a large spoon I painted grey using old white chalk paint and slate gray craft paint.........

A couple of close ups....


Got a tip to add to "Tip of the Week"..........just leave a comment and I will try and use it!! Thanks!!
Kari
Wednesday, September 21, 2011
BIG.............Finial!!
Earlier this year I was blog surfing ( I guess that what is is called) and I came across this real cool finial at Mod Vintage Life and was totally impressed. Wow, I want to do that but how to find the lamp to do it with. So, I looked around at the various thrift stores and not a lamp to be found that would foot the bill.
So I quit looking. Just put that idea on the back burner. Then I talked my hubby into going into Goodwill that is on the way to the cottage. He would not go in. He stayed in the car with the girls and listened to his "50's on 5" !!
Well the look on his face was priceless when I came out with this......

"What in the world are you going to do with that "thing"". Of coarse I had a plan so home it went. Here are a couple of other pics.

I am sure she was beautiful in 1975!! Anyway, I cut off the cord and removed the socket that was there (but not in my pics!!) I then gave her a good scrubbing and painted her with chalk paint in Olde White. I let that dry and then distressed her with some dark brown paint. I then painted a small wooden finial that I had and glued it on the top of the lamp.


Viola.........a big, heavy, finial. I am not quite sure where it is going to go in my house but I am sure I will find a place for it!!
Kari
Linked to:
http://frenchcountrycottage.blogspot.com/
http://commonground-debrasvintagedesigns.blogspot.com/
http://funkyjunkinteriors.blogspot.com/
http://linda-coastalcharm.blogspot.com/
http://www.myuncommonsliceofsuburbia.com/
So I quit looking. Just put that idea on the back burner. Then I talked my hubby into going into Goodwill that is on the way to the cottage. He would not go in. He stayed in the car with the girls and listened to his "50's on 5" !!
Well the look on his face was priceless when I came out with this......

"What in the world are you going to do with that "thing"". Of coarse I had a plan so home it went. Here are a couple of other pics.
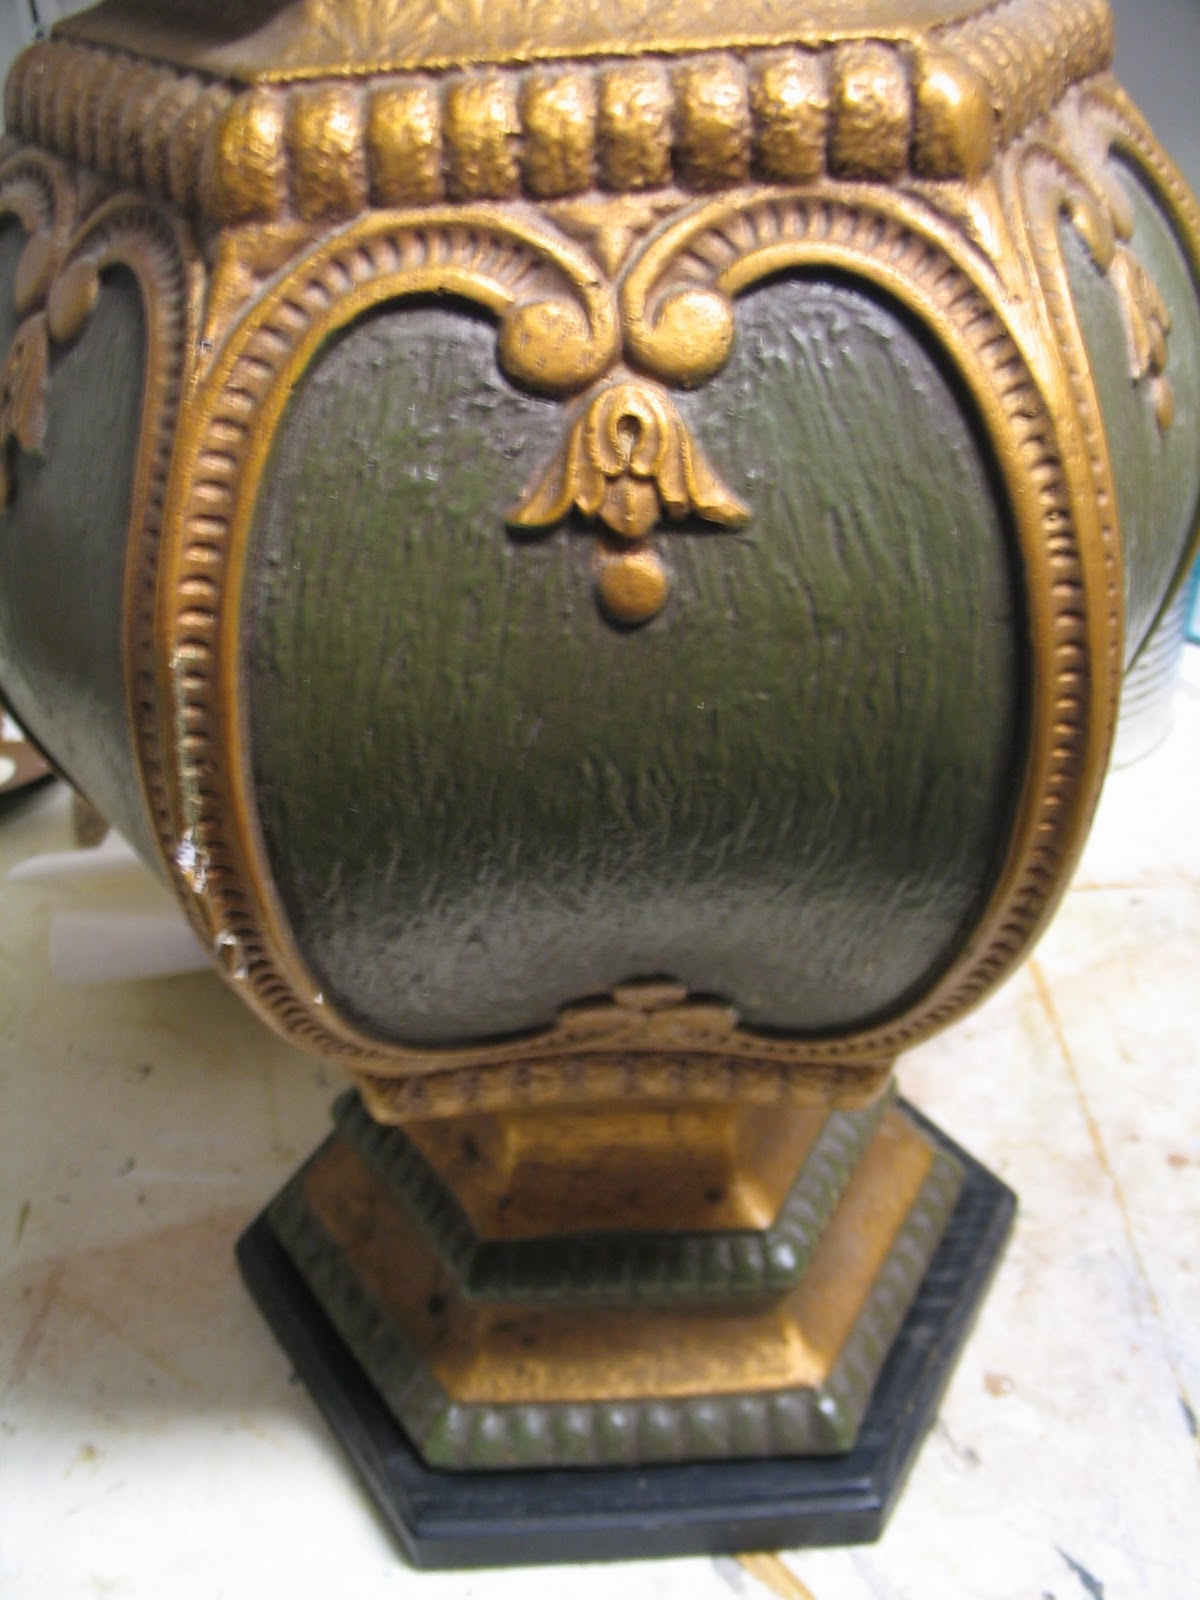
I am sure she was beautiful in 1975!! Anyway, I cut off the cord and removed the socket that was there (but not in my pics!!) I then gave her a good scrubbing and painted her with chalk paint in Olde White. I let that dry and then distressed her with some dark brown paint. I then painted a small wooden finial that I had and glued it on the top of the lamp.


Viola.........a big, heavy, finial. I am not quite sure where it is going to go in my house but I am sure I will find a place for it!!
Kari
Linked to:
http://frenchcountrycottage.blogspot.com/
http://commonground-debrasvintagedesigns.blogspot.com/
http://funkyjunkinteriors.blogspot.com/
http://linda-coastalcharm.blogspot.com/
http://www.myuncommonsliceofsuburbia.com/
Subscribe to:
Posts (Atom)